SMS Passcode/CensorNet MFA authentication alerts – integration manual
Original document available here
This document outlines the process of enabling a SMSEagle modem as a web service in SMS PASSCODE version 8.0.
Should you have an earlier version of SMS PASSCODE, then please upgrade to latest version or contact SMS PASSCODE Support for help with configuration
In version 9.0 and higher of SMS Passcode/CensorNet MFA, SMS integration with SMSEagle is available out-of-the-box. You don’t have to do any special integration steps.
SMSEagle Setup
Create a new user in SMSEagle.
SMS Passcode Setup
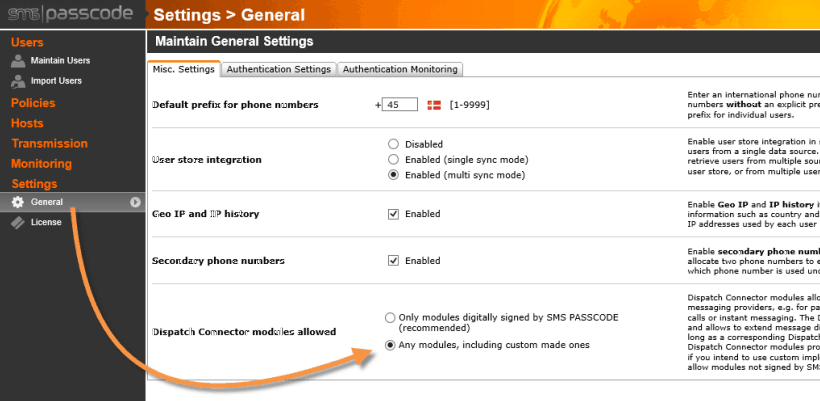
- Please make sure that you have enabled the ability to use custom dispatcher

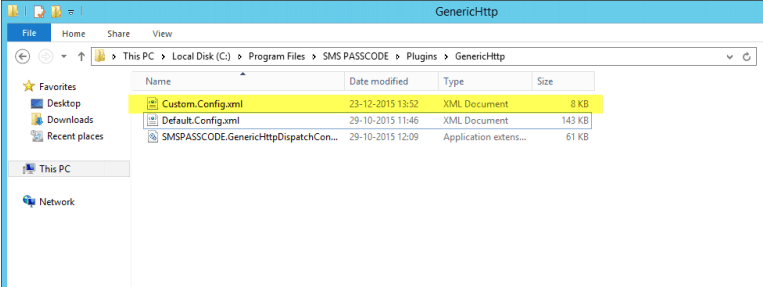
- Once enabled you need to add the SMSEagle to the custom file.By default in the SMS PASSCODE folder, in C:\program files\SMSPASSCODE\Plugins\GenericHttp\

- Edit this file, and replace with this text (or add the configuration to the current XML.
- Please find the text saying: CHANGEME2IP and change that to ip address of the SMSEagle.
- Save the SMSEagle XML to the custom file, and restart the SMS PASSCODE Database service.
[code language=”xml”]
<?xml version="1.0" encoding="utf-8"?>
<DispatcherTemplate
xmlns:xsi="http://www.w3.org/2001/XMLSchema-instance"
xmlns:xsd="http://www.w3.org/2001/XMLSchema">
<DispatcherProfiles>
<DispatcherProfile>
<Name>SMSEagle</Name>
<ProviderID>c6666653-baba-4850-8612aaaaaaaa3212</ProviderID>
<UserParameterDefinitions>
<UserParameterDefinition Name="UserName">
<MaxLength>0</MaxLength>
<Caption>Username</Caption>
<HelpText>The username associated with the account to be used</HelpText> <Type>String</Type>
<AllowEmptyValue>false</AllowEmptyValue>
</UserParameterDefinition>
<UserParameterDefinition Name="Password">
<MaxLength>0</MaxLength>
<Caption>Password</Caption>
<HelpText>The password associated with the account to be used</HelpText> <Type>String</Type>
<AllowEmptyValue>false</AllowEmptyValue>
</UserParameterDefinition>
<!– <UserParameterDefinition Name="IP">
<MaxLength>0</MaxLength>
<Caption>IP</Caption>
<HelpText>The IP adress or the hostname of the SMSEagle</HelpText>
<Type>String</Type>
<AllowEmptyValue>false</AllowEmptyValue>
</UserParameterDefinition>–>
</UserParameterDefinitions>
<Uri>http://CHANGEME2IP/index.php/http_api/send_sms</Uri>
<DispatchTypes>
<SupportedDispatchType>
<Uri />
<Headers />
<Method>GET</Method>
<Type>SMS</Type>
<Target>PhoneNo</Target>
<SupportsFlash>true</SupportsFlash>
<MessageType>Any</MessageType>
<ParametersNormal>
<TextElement>login=</TextElement>
<UserParameter Name="UserName" />
<TextElement>&pass=</TextElement>
<UserParameter Name="Password" />
<TextElement>&to=[TARGET]&message=[TEXT]</TextElement>
</ParametersNormal>
<ParametersFlash>
<TextElement>Login=</TextElement>
<UserParameter Name="UserName" />
<TextElement>&passw=</TextElement>
<UserParameter Name="Password" />
<TextElement>&to=[TARGET]&message=[TEXT]&flash=1</TextElement>
</ParametersFlash>
<MessageTransformations />
</SupportedDispatchType>
</DispatchTypes>
</DispatcherProfile>
</DispatcherProfiles>
</DispatcherTemplate>
[/code]
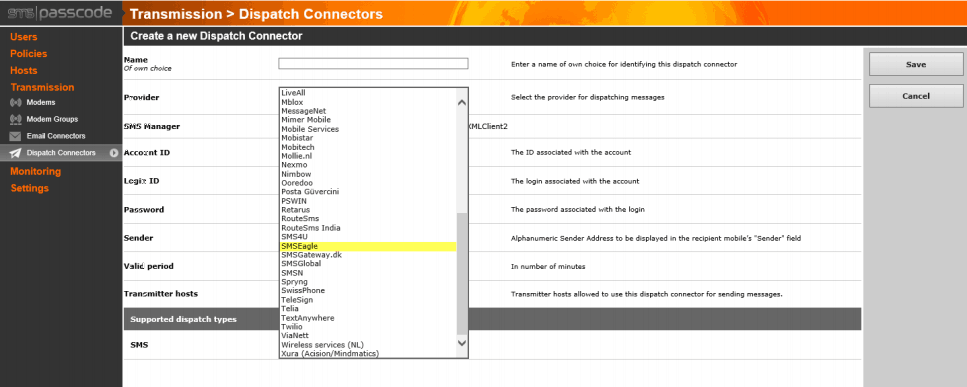
- Now please navigate to the SMS PASSCODE Web Administration Interface, transmission, Dispatch connectors.
- Choose SMSEagle, and fill in the account data, and you will be up and running (remember to assign the SMSEagle to a dispatch policy)


